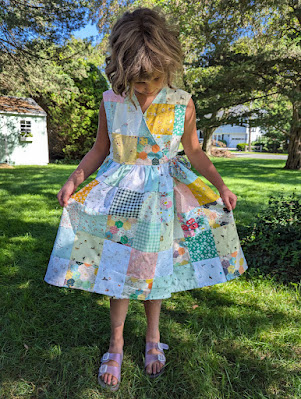
Hello hello! It's been a busy, sidetracking summer as usual, and I'll be back soon with more updates. But look! I made this super-fun reversible patchwork dress for C! Come see how I did it!
The first step was "making fabric" by piecing together charm squares (and other prints I cut to 5"x5" squares -- thank you, 5"x5" sewing ruler!! So handy!). I made the pieces juuust to the size of my pattern, for less waste! (Pattern is Violette Field Threads Olive wrap dress)
Here are the outer bodice pieces, cut out!
If you can't see, the prints I chose are mostly teeny tiny animals, and some floral pastels. Most come from charm packs and a layer cake of Minki Kim's "Hidden Cottage" and Wishwell's "Petit". Cats, dogs, chicks, hamsters, rabbits, geese, fish . . . teeny tiny adorable animals!!
The skirt of this dress is HUGE and very gathered. In the same way, I built the skirt sections out of charm squares.
Here are my squares in my typical organizational scheme for piecing. First I lay the squares out the way I want them (and take a picture just in case!), then stack each row in order and put a "bookmark" between each row (just skinny scraps of paper I've labelled; I reuse them), in one big ordered pile. (That's in case I have to leave the project for whatever reason; it's safely organized! I paper-clip the bookmarks together on the sides if I'm leaving it a long time.) Then I grab a pile, lay out 3-5 rows on the side of my desk, and chain piece this subsection of rows at once. Repeat!
I've gotten in the habit of pressing the rows while they're still connected from chain-piecing. It makes it easier to get those seams going in the right directions*. Then I snip the rows apart, pile them, and sew them together into the big rectangle.
Here is the full skirt panel!!! It's CRAZY LONG! The pattern had me make the back, left, and right panels separately and put them together into THIS! It's a wrap dress though, so it makes sense. Also, I took on the extra patchwork piecing step myself; it's not part of the pattern.
Here is the bodice all put together, with the lining (which is face down in the photo). I realize I didn't take any photos of the lining/other reverse side, but I had to do ALL these steps for that part, too! Only it wasn't pieced so that was less work!
Here's the finished dress (outside)!
I didn't photograph how I made the ties, but it's just some bias tape I had made previously, sewn into ties. It ties inside and out and magically works for both sides! Yay, reversibility! The pattern had an option for a more fixed closure, but I'm all about the ADJUSTABILITY of these ties, for comfort and growth!!
And here's the reverse side. Ironically, after all my work piecing the other side, Claire loves these owls and so far has worn it this side out, HAH!
It's a fun, twirly dress! I made it plenty big (I always worry with wovens), so she can easily wear a shirt under it as the weather cools off.
*I always press my seams in one direction or other; I never press open. In my experience, pressing open leads to weaker seams, which means more pulling stress and more holes!


This is super adorable!
ReplyDeleteThanks!
Delete